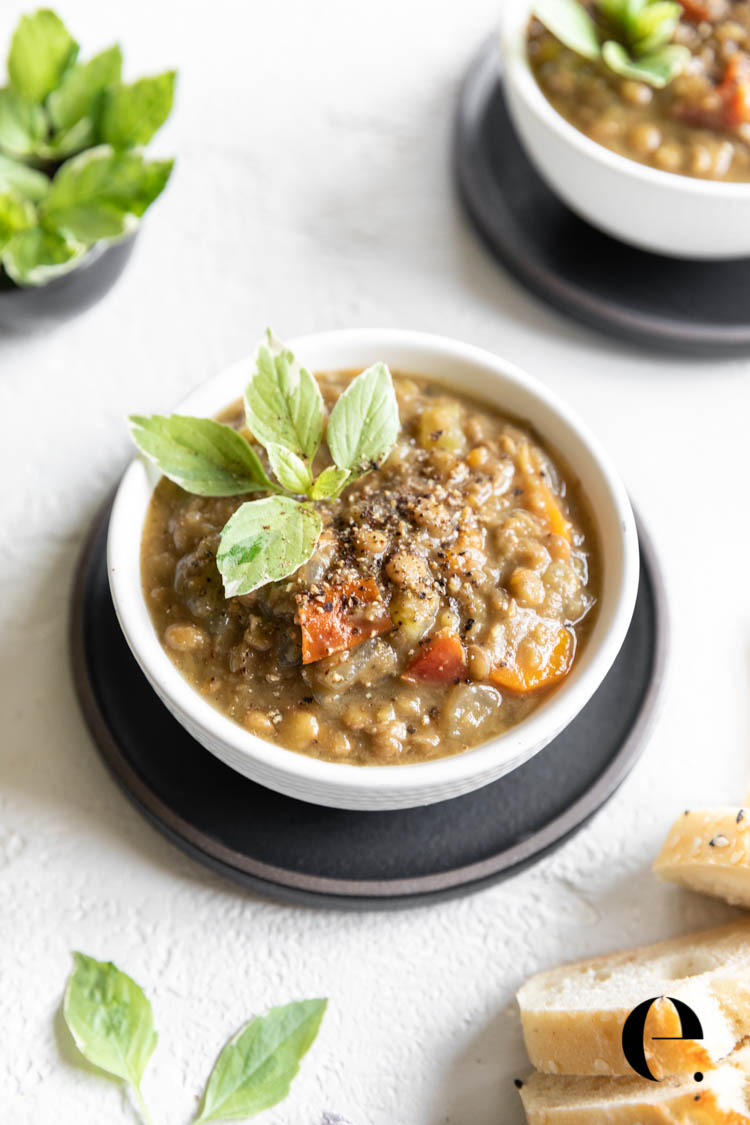
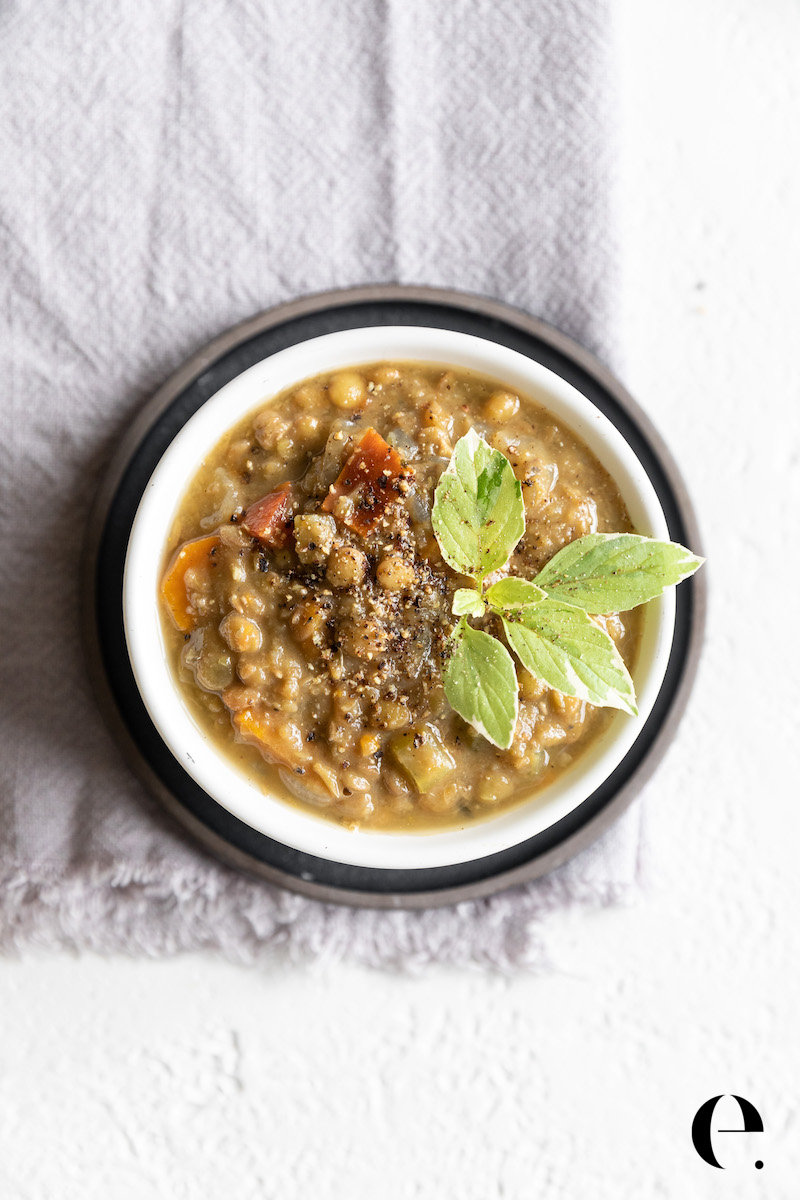
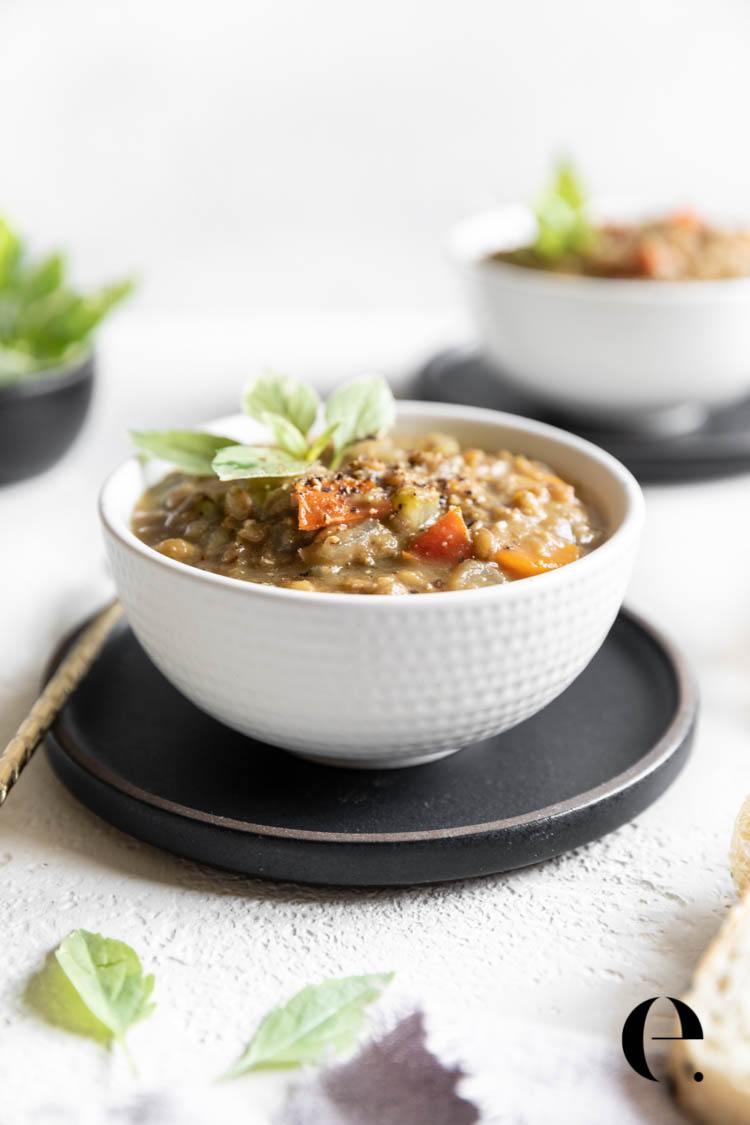
This is hands down the best lentil soup recipe—and once you try it, you’ll see why. It’s cozy, nourishing, full of rich flavor, and incredibly easy to make, even on a busy weeknight.
This healthy lentil soup is also one of the most affordable meals you can make. For about $10, you’ll have a big pot of soup that feeds 6–8 people, making it perfect for meal prep, family dinners, or freezing for later.
With simple pantry ingredients and minimal prep, this easy lentil soup recipe comes together quickly on the stovetop (or in a slow cooker). It’s naturally high in plant-based protein, fiber, and essential vitamins, so it’s filling, satisfying, and genuinely good for you.
If you’re new to lentils, this is the recipe that will convert you.
Why You’ll Love This Lentil Soup Recipe
Lentil soup is a complete, balanced meal all on its own.
Lentils provide protein, complex carbohydrates, and fiber, while vegetables, herbs, and spices add antioxidants and flavor. A drizzle of extra-virgin olive oil adds healthy fats and makes the soup extra satisfying.
Lentils are especially rich in B vitamins, iron, potassium, phosphorus, and zinc. This soup is naturally low in saturated fat, low in sodium (depending on your broth), and very budget-friendly—one reason lentils are often considered a nutritional superfood.
Another reason this is the best lentil soup: it’s extremely flexible. You can make it on the stovetop for deeper flavor, or toss everything into a slow cooker for an effortless, hands-off meal.
Lentil soup is so flexible and can be made in a huge variety of ways. While I prefer to make this soup on the stovetop to bring out each ingredient’s flavor while sauteing, you can just throw it all in a slow-cooker and come home to a great meal.
What Are Lentils?
Lentils are legumes, similar to beans, peanuts, and soybeans. They’re technically a “pulse,” meaning the dried edible seed of a legume plant. Lentils cook faster than most beans, don’t require soaking, and are one of the easiest plant proteins to work with.
Easy Lentil Soup Ingredients
Base Ingredients
4 cups (1 quart) vegetable stock (or chicken stock, bone broth, or filtered water)
2 cups filtered water (or more stock)
1½ cups lentils, rinsed (soaking optional)
3 tablespoons extra virgin olive oil
1 small yellow or white onion, diced
2 celery ribs, diced
1 large carrot, diced or grated
3–4 cloves garlic, finely chopped or pressed
Flavor Boosters
1 teaspoon ground cumin
½ teaspoon dried oregano
1 bay leaf
1 tablespoon red wine vinegar (or fresh lemon juice or balsamic)
Salt and black pepper, to taste
Optional Add-Ins
Fresh tomatoes
Fresh greens (kale, spinach, chard)
See the full recipe in the printable recipe card below.
How to Choose Your Type of Lentils
I love using small dark green lentils (French lentils) because they’re sturdy, cook quickly, and hold their shape beautifully.
That said, all lentils work well in this soup:
Green lentils – Classic, hold their shape
Red lentils – Break down and make a creamier soup
Brown lentils – Soft and mild, slightly more “mushy”
Black lentils (beluga) – Firm, earthy, very nutrient-dense
They’re all affordable, nutritious, and worth rotating depending on the texture you like.
Do You Need to Soak Lentils?
Short answer: No, soaking is not required.
Lentils cook faster than most legumes and don’t need soaking to be digestible. I usually skip it.
That said, soaking can help if:
You want slightly faster cooking
Lentils tend to bother your digestion
If you soak:
Soak 12–24 hours
Discard soaking water
Rinse before cooking
This can make lentils easier to digest for some people.
Are Lentils Gluten-Free?
Yes — lentils are naturally gluten-free. Just check the label to make sure they weren’t processed in a facility that handles gluten.
Tips & Lentil Soup Variations
Tips & Lentil Soup Variations
Customize it: This recipe is a flexible base. Add your favorite herbs, spices, or vegetables to make it your own. A squeeze of fresh lemon juice at the end adds brightness. (You might also like my Lemony Red Lentil Soup.)
Add more veggies: Stir in a few big handfuls of kale, spinach, or hearty greens during the last few minutes of cooking. If adding harder veggies or potatoes, add about ⅓ cup liquid for every ¼ cup of vegetables to keep the texture balanced.
Make it taste amazing: A dash of acid (lemon juice, lime juice, or vinegar) is the secret to making any soup taste more vibrant and balanced.
What to serve with it: Crusty bread, cornbread, or a simple side salad pair perfectly.
Make it vegan: Use vegetable broth instead of chicken or bone broth.
Boost the protein: Use bone broth, or top with parmesan, Greek yogurt, or serve with a high-protein bread.
Change up the spices: Try curry powder, smoked paprika, cayenne, or chili flakes. Fresh parsley or cilantro makes a great garnish, and lemon zest adds brightness.
Control the consistency: For a thicker soup, blend 1–2 cups and stir it back in. For a thinner soup, add more broth or water. You can also blend it in a blender or food processor if you want it smooth.
Instant Pot version: Sauté aromatics, add remaining ingredients, and cook on high pressure for 10–12 minutes, then quick release.
Slow cooker version: Add everything to a Crockpot and cook on low 6–8 hours or high 3–4 hours.
Storage & freezing: Store in an airtight container in the fridge up to 4 days, or freeze up to 3 months. Reheat gently on the stovetop or microwave.
Cheese option: A sprinkle of parmesan adds savory depth (optional if keeping it vegan).
Storage
This lentil soup stores beautifully and tastes even better the next day as the flavors continue to develop.
Refrigerator: Store in an airtight container for up to 4 days
Freezer: Freeze for up to 3 months
Thawing: Thaw overnight in the refrigerator for best texture
Reheating: Reheat gently on the stovetop over low heat or in the microwave in 1–2 minute intervals, stirring in between
Meal Prep Tips
This is one of the best recipes for meal prep; it’s hearty, filling, and holds up incredibly well.
Make a big batch on Sunday and enjoy it for easy lunches all week
The flavors deepen overnight, so it’s often even better the next day
Portion into individual containers for grab-and-go meals
Great for freezing in single servings for quick, healthy dinners
Add fresh herbs, lemon juice, or a drizzle of olive oil after reheating to make it taste freshly made again
This is exactly the kind of recipe that makes healthy eating feel easy.
Have You Made This Lentil Soup Recipe?
I can’t wait to hear from you and how you like this recipe. Make sure to comment below and give it a star rating.
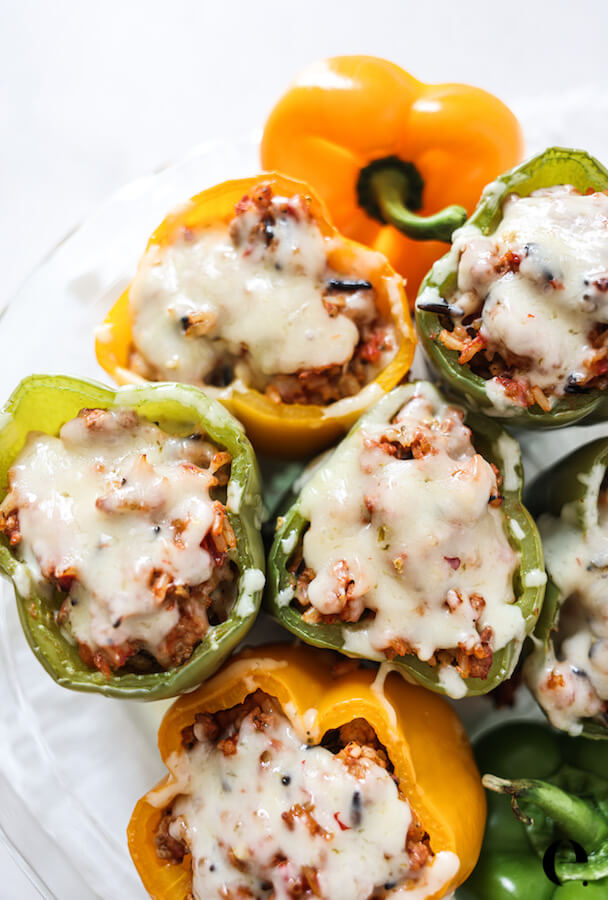
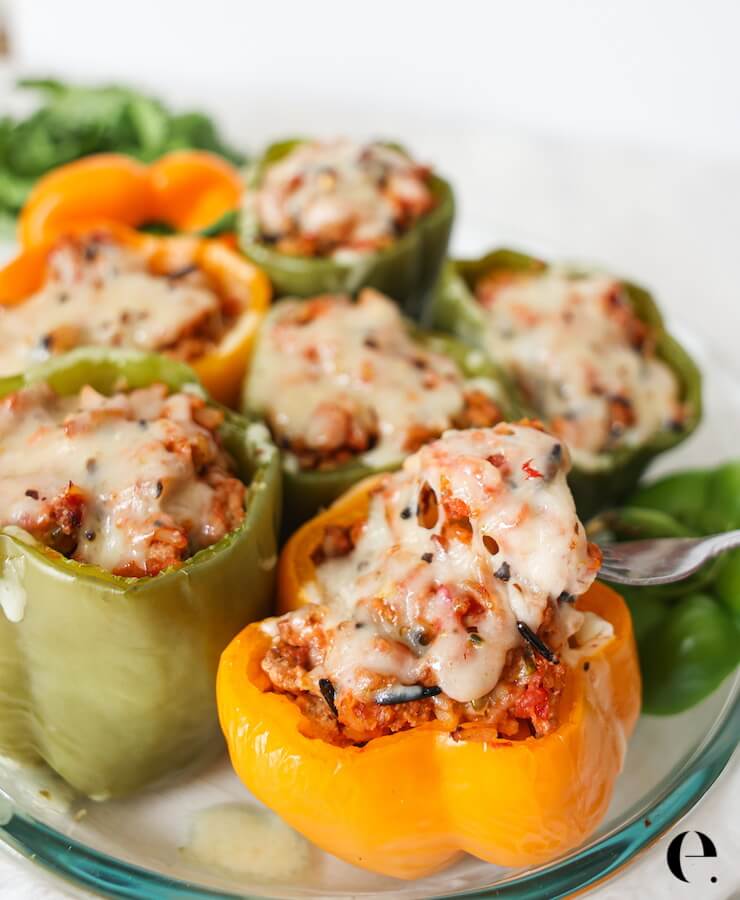
These Ground Turkey Stuffed Peppers are an easy, healthy dinner made with ground turkey, rice, crushed tomatoes, and melty cheese baked inside tender bell peppers. This family-friendly stuffed peppers recipe is ready in under an hour and perfect for meal prep or busy weeknights.
They’re cozy, satisfying, and endlessly customizable—one of those reliable dinners you’ll want on repeat.
Why You’ll Love This Recipe
Easy, wholesome weeknight dinner
Family-friendly (even for picky eaters)
High in protein
Customizable with what you have
Great for leftovers and meal prep
Key Ingredients
Bell Peppers: Use any colors you like. A mix of red, yellow, and orange makes this dish extra vibrant.
Ground Turkey: Lean and mild. You can also use ground chicken or 90/10 lean ground beef.
Rice: Brown rice is my go-to, but any cooked rice or quinoa works.
Crushed Tomatoes: Adds moisture and holds the filling together. Look for a brand without added sugar.
Onion & Garlic: The flavor base that makes everything taste better.
Cheese: Pepper jack adds a little kick, but cheddar or mozzarella work great too.
Spices: Salt, pepper, and optional taco seasoning for extra flavor. I recommend using the taco seasoning, but I ran out once and these turkey stuffed peppers were still great!
How to Make Turkey Stuffed Peppers (No-Boil Method)
Prep the peppers: Preheat oven to 375°F. Cut the tops off the bell peppers and remove seeds and membranes. Arrange cut-side up in a lightly greased baking dish.
Cook the turkey: Heat olive oil in a large skillet over medium heat. Add onion and cook 3–4 minutes until soft. Add garlic (and taco seasoning, if using) and cook 30 seconds. Add turkey and cook until browned, draining excess fat. Stir in crushed tomatoes, cooked rice, salt, and pepper. Mix in ½ cup cheese until melted.
Assemble & bake: Spoon the turkey mixture into the peppers. Cover loosely with foil and bake for 30 minutes. Remove foil, sprinkle with remaining cheese, and bake 10–15 more minutes, until peppers are tender and cheese is melted. Garnish with fresh cilantro and serve.
Easy Variations
Add more veggies: Stir in chopped spinach, mushrooms, zucchini, or corn to boost the veggie content and add more texture and flavor.
Swap the protein: Use ground chicken, 90/10 lean ground beef, or a plant-based ground alternative instead of turkey.
Make it Tex-Mex: Replace the crushed tomatoes with salsa, add black beans, and finish with jalapeños for a bold, Southwest-style twist.
Make it grain-free: Swap the rice for cauliflower rice for a lighter option, or use black beans for a protein-rich, grain-free filling.
Switch up the cheese: Cheddar, mozzarella, or a dairy-free shredded cheese all work well if you want a different flavor profile.
Stuffed Peppers Topping Ideas
Avocado or guacamole
Salsa
Sour cream
Fresh herbs
Jalapeños or hot sauce
A squeeze of lime
Storage
Store leftovers in an airtight container in the fridge for 2–3 days. Reheat in the oven or microwave.
Stuffed Peppers FAQ
Do I have to boil the peppers first? No—this no-boil method gives better flavor and texture with fewer steps. If you prefer, you can parboil them for 5 minutes, then turn them upside down to drain. They will cook faster in the oven, but we skip this step for fewer dishes and cleanup. Cooking them a little longer in the oven is enough to get the peppers soft.
What should I serve with stuffed peppers? A simple green salad or cilantro lime slaw pairs perfectly.
Are turkey stuffed peppers healthy? Yes! They’re packed with lean protein, veggies, and whole grains.
More Healthy Mexican-Inspired Recipes
If you liked this stuffed pepper recipe, here are some more Mexican-inspired recipes to try next:
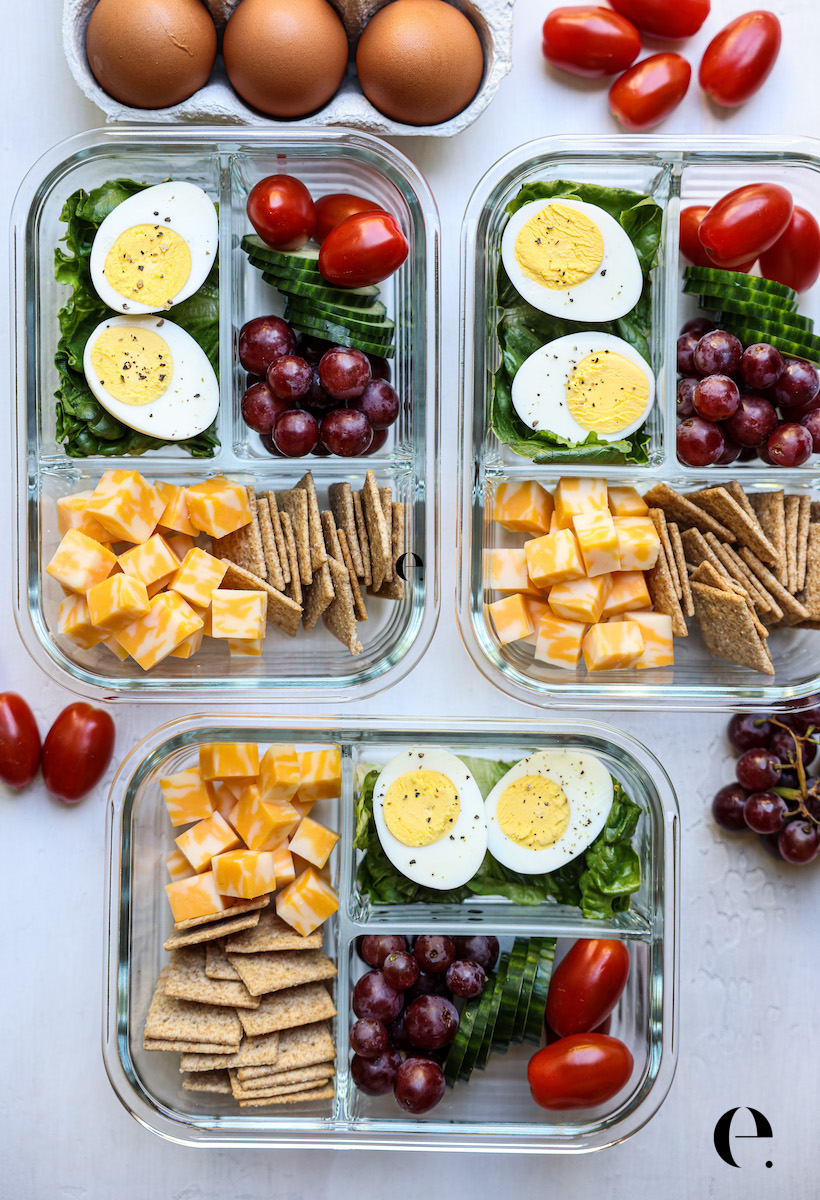
Need something quick, easy, and healthy to grab on your way out the door?
Meet the Homemade Lunchable, your new favorite no-stress lunch.
It’s nostalgic, totally customizable, and perfect for meal prep. Even better? You can make most of it without turning on the stove. These little bento-style lunches keep well in the fridge for days, give you real variety, and somehow make lunch feel fun again.
Kids love them. Adults rely on them.
What You’ll Need for Homemade Lunchables
To build a balanced lunchable, aim for:
1 protein (turkey, chicken, hard-boiled eggs, high-protein cheese, tofu, etc.)
2–3 fruits and vegetables
1 starch or crunchy item (crackers, mini-breads, chips, carrots, etc.)
1 small treat or healthy fat
Here are some easy ingredient ideas to get you started.
For fruits and vegetables, go big on fresh, colorful options:
Grapes
Cherry tomatoes
Baby carrots
Cucumber slices
Bell pepper strips
Apple slices or berries
For proteins, choose something satisfying that holds up well in the fridge:
Sliced deli turkey, ham, or roast beef (look for low-nitrate/low sodium options)
For something crunchy or starchy, pick one you actually look forward to eating:
Crackers
Rice cakes
Pretzels
Roasted chickpeas or white beans
For dips, fats, and a little something sweet, add one or two extras:
Hummus or guacamole
Nuts or trail mix
A square or two of dark chocolate
Lunchable Containers
You’ll want containers that keep everything neat and easy to grab. Use divided bento-style boxes or small reusable containers with tight-fitting lids. Glass divided containers are especially great because they keep food fresh and don’t hold onto odors.
This simple avocado salad is fresh, creamy, and full of bright lime flavor.
It comes together in minutes with just a few real-food ingredients, making it the perfect side dish for busy weeknights, summer dinners, or anytime you want something light but satisfying. It’s full of fiber and great flavor, too.
It’s also flexible; you can substitute the lime for lemon or swap out the cilantro for parsley or another green if you don’t like cilantro.
If you’ve ever needed a fast, healthy dish that feels special without being fussy, this is the one. Crunchy cucumber, creamy avocado, fresh herbs, and a lightly sweet lime dressing make this salad refreshing, nourishing, and endlessly versatile.
Why You’ll Love This Avocado Salad
Ready in 5 minutes
Made with simple, whole ingredients
Naturally gluten-free and dairy-free
Refreshing, hydrating, and light
Easy to customize with what you have on hand
Ingredients
1 English cucumber, diced
1 large avocado, peeled and diced
1/4 cup fresh cilantro, chopped (or parsley, if preferred)
1–2 tablespoons fresh lime juice (from 1 lime)
2 teaspoons honey (omit, if preferred)
1/2 teaspoon fine sea salt or kosher salt
How to Make Simple Avocado Salad
Add the diced cucumber, diced avocado, and chopped cilantro to a medium bowl.
Drizzle the lime juice and honey over the salad, then sprinkle with the salt.
Gently toss to coat. Taste and adjust with more lime or salt as needed.
Serve immediately.
Tip: Toss gently so the avocado stays in chunks instead of turning into a mash.
What to Serve with Avocado Salad
This salad pairs beautifully with:
Grilled chicken or shrimp
Tacos or fajitas
Baked salmon or white fish
Rice bowls or quinoa bowls
As a fresh topping for toast or inside wraps
Easy Variations
Spicy: Add a pinch of red pepper flakes or diced jalapeño
Extra crunch: Add thinly sliced red onion
More protein: Toss in chickpeas, grilled chicken, or shrimp
Richer flavor: Drizzle with a little extra-virgin olive oil
This avocado salad is best enjoyed fresh. If you have leftovers, store them in an airtight container in the fridge for up to 24 hours. Press a piece of parchment or plastic wrap directly onto the surface to help prevent the avocado from browning.
Simple, Fresh, and Always a Hit
This Simple Avocado Salad Recipe proves that healthy food doesn’t have to be complicated. It’s light, flavorful, and comes together fast—exactly the kind of recipe you’ll keep in your weekly rotation.
If you try this recipe, leave a comment and let me know how you served it!